So you’re ready to hit the open water and experience the exhilaration of kayaking, but you want to make sure you have all the necessary safety measures in place. One important aspect to consider is how to securely attach kayak stabilizers. Whether you’re a seasoned pro or just starting out, this article will guide you through some of the best practices for ensuring a stable and secure kayaking experience. From choosing the right stabilizers to properly attaching them to your kayak, we’ve got you covered. So let’s dive in and explore the world of kayak stabilizers together!

Determining the Type of Stabilizers
Outriggers
When it comes to choosing the right stabilizers for your kayak, outriggers are a popular option. Outriggers are extended attachments that provide additional support and stability to your kayak. They consist of a sturdy bar or pole that extends outwards from the sides of your kayak, providing a wider base and reducing the risk of tipping over. Outriggers are often preferred by beginners or those who prioritize maximum stability.
Floatation Bags
Another type of stabilizer that you can consider is floatation bags. Floatation bags are inflatable bags that are attached to the sides or underneath your kayak. They increase buoyancy and help keep your kayak afloat, especially in case of capsizing or taking on water. Floatation bags are often preferred by more experienced kayakers as they offer a good balance between stability and maneuverability.
Choosing the Right Stabilizers
Consider Kayak Size and Weight
When choosing stabilizers for your kayak, it’s important to consider the size and weight of your kayak. Different stabilizers have different weight capacities, so you need to ensure that the stabilizers you choose can adequately support the weight of your kayak and any additional gear or equipment you may have. Additionally, the size of your kayak will also determine the length and width of the stabilizers you need.
Paddler Experience and Skill Level
Your experience and skill level as a paddler should also be taken into account when choosing stabilizers. If you’re a beginner or have limited experience in kayaking, you may want to opt for stabilizers that provide maximum stability, such as outriggers. On the other hand, if you’re an experienced kayaker and are looking for more maneuverability, floatation bags may be a better choice.
Budget
Lastly, your budget will also play a role in determining the type of stabilizers you can afford. Outriggers tend to be more expensive compared to floatation bags, so if budget is a concern, you may lean towards the latter option. However, it’s important to prioritize quality and ensure that the stabilizers you choose are durable and reliable, regardless of your budget.

Preparing the Stabilizers
Assembling the Outriggers
If you have chosen outriggers as your stabilizers, assembling them is the first step. Most outriggers come with detailed instructions and all the necessary hardware for assembly. Start by carefully reading the instructions and lay out all the parts. Follow the step-by-step guide provided, ensuring that you assemble the outriggers correctly and securely. It’s always a good idea to double-check the connections and tighten any bolts or screws to prevent any accidents or issues later on.
Inflating the Floatation Bags
For those who opt for floatation bags, the next step is inflating them. Before inflating the bags, check for any damages or leaks to ensure they are in proper working condition. Use a pump or your preferred inflation method to inflate the bags to the recommended air pressure. It’s important not to overinflate the bags, as this can affect their performance and durability. Take your time during the inflation process to ensure the bags are evenly inflated and free from any twists or tangles.
Inspecting for Damages
Regardless of the type of stabilizers you choose, it’s crucial to thoroughly inspect them for any damages or wear and tear. Check for any signs of cracks, breaks, or weak spots in the materials. Look for loose or rusted hardware that may need to be replaced. By conducting a thorough inspection, you can identify any potential issues and address them before attaching the stabilizers to your kayak.
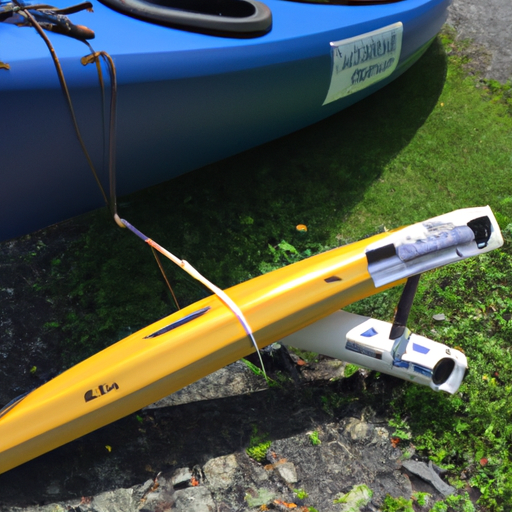
Attaching Outriggers
Ensuring Proper Positioning
When attaching outriggers to your kayak, it’s important to ensure proper positioning. The outriggers should be placed symmetrically on both sides of the kayak, allowing for an equal distribution of weight and stability. Take into account the size and width of your kayak, as well as any existing attachments or accessories that may interfere with the placement of the outriggers. Positioning the outriggers correctly is crucial for optimal stability and performance.
Securing Outriggers with Mounting Hardware
To attach the outriggers securely to your kayak, you will need to utilize the provided mounting hardware. This usually includes bolts, screws, or clamps that are specifically designed for attaching outriggers. Follow the instructions provided with your outriggers and carefully attach them to the designated mounting points on your kayak. Ensure that the hardware is tightened securely to prevent any movement or shifting of the outriggers during your kayaking adventures.
Adjusting the Outrigger Length
Once the outriggers are securely attached, you may need to adjust their length to achieve the desired level of stability. Most outriggers have adjustable arms or poles that can be extended or retracted. If you’re a beginner, you may want to start with longer outrigger arms for maximum stability. As you gain experience and confidence, you can gradually decrease the length of the outriggers to allow for more maneuverability. Experiment with different lengths and find the perfect balance that suits your paddling style and preferences.

Installing Floatation Bags
Selecting the Right Placement
Before installing the floatation bags on your kayak, consider the best placement for them. Floatation bags are usually attached to the interior of your kayak’s hull, either on the sides or underneath the seat. The placement should provide optimal buoyancy without interfering with your paddling or comfort. It’s recommended to consult the instructions provided by the manufacturer to determine the best placement for your specific kayak model.
Securing Floatation Bags to Kayak
To securely install floatation bags, you will need to use the provided attachment points or straps. These attachment points are usually located inside the hull of your kayak and are specifically designed for securing the floatation bags. Follow the instructions provided and attach the bags securely, ensuring that they are tightly fastened. Double-check the attachment points for any signs of wear or damage, as these can compromise the effectiveness of the floatation bags.
Adjusting the Air Pressure
After the floatation bags are attached, it’s important to adjust the air pressure to the recommended level. The proper air pressure will vary depending on the size and weight of your kayak, as well as your personal preferences. Use a pressure gauge or follow the guidelines provided by the manufacturer to ensure that the bags are inflated to the correct pressure. Properly inflated floatation bags will provide the necessary buoyancy and stability to keep your kayak afloat in case of emergencies.
Securing Stabilizers to the Kayak
Using Lashing Straps
One common method of securing stabilizers to a kayak is by using lashing straps. Lashing straps are strong and durable straps that can be easily tightened and adjusted. To secure the stabilizers using lashing straps, begin by looping the strap around the kayak and the stabilizer attachment point. Pull the strap tight and secure it by buckling or tying it securely. Repeat the process for all attachment points, ensuring that the straps are tight enough to prevent any movement or shifting of the stabilizers.
Utilizing Bungee Cords
Another option for securing stabilizers is to use bungee cords. Bungee cords are elastic cords with hooks on each end, making them convenient for attaching and securing stabilizers. Start by hooking one end of the bungee cord to the kayak, near the attachment point. Stretch the bungee cord across to the stabilizer and hook the other end securely. Repeat this process for all attachment points, ensuring that the bungee cords are taut and holding the stabilizers firmly in place.
Using Quick-Release Clips
For those who prefer a quick and easy method of securing stabilizers, quick-release clips can be a great option. Quick-release clips are designed for fastening and releasing attachments with minimal effort. Attach one end of the quick-release clip to the kayak and the other end to the stabilizer attachment point. Ensure that the clip is securely fastened and locked into place. Quick-release clips provide a convenient and efficient way of securing stabilizers while allowing for easy detachment when needed.
Tightening and Adjusting Connections
Checking for Stability
Once the stabilizers are attached to your kayak, it’s essential to check for stability before hitting the water. Gently rock the kayak from side to side to test the stability of the stabilizers. If there is any excessive movement or instability, check the connections and attachments for any loose or weak points. Tighten any bolts, screws, or straps that may need adjustment. Ensuring the stability of the stabilizers before setting out on your kayaking adventure is crucial for a safe and enjoyable experience.
Adjusting for Paddler Balance
Each paddler has a unique center of balance, and it’s important to adjust the stabilizers accordingly. Once you’re in the kayak, observe how it sits in the water and how the stabilizers support your weight. If you feel any imbalance or instability, make minor adjustments to the stabilizers’ position or length. Experiment with different settings until you find the configuration that provides the optimal balance for your paddling style and comfort.
Ensuring Secure Fastenings
Before heading out onto the water, double-check all the connections and fastenings to ensure they are securely in place. Give each attachment point a gentle tug to ensure it’s tight and won’t come loose during your kayaking session. Inspect the straps, cords, or clips for any signs of wear or damage. It’s better to be safe than sorry, and taking a few extra minutes to ensure everything is secure can make a significant difference in your safety and stability on the water.
Testing the Stability
Practicing in Calm Waters
Once you have properly attached and adjusted the stabilizers, it’s time to test their stability in calm waters. Find a calm and controlled environment, such as a lake or a calm stretch of river, to practice and get accustomed to the added stability provided by the stabilizers. Begin by paddling slowly and gradually increase your speed, paying attention to the kayak’s stability and your overall comfort level.
Gradually Testing in More Challenging Conditions
Once you feel comfortable with the stabilizers in calm waters, you can gradually test their stability in more challenging conditions. Increase the difficulty by paddling in slightly choppy waters or practicing maneuvers such as edging or turning. Observe how the stabilizers perform and how they affect your kayak’s stability and maneuverability. It’s essential to gain confidence and familiarity with the stabilizers in various conditions to ensure they meet your specific needs and preferences.
Monitoring Performance and Making Adjustments
Throughout your testing phase, it’s important to monitor the performance of the stabilizers and make any necessary adjustments. Pay attention to any issues or concerns that arise, such as excessive movement or inadequate support. These observations will help you determine if any further adjustments or modifications are required to enhance the stability and overall performance of the stabilizers. Regular monitoring and adjustments will ensure that you get the most out of your stabilizers and have a safe and enjoyable kayaking experience.
Maintaining and Inspecting Stabilizers
Routinely Cleaning and Drying
To keep your stabilizers in optimal condition, it’s important to routinely clean and dry them. After each kayaking session, rinse off any dirt, saltwater, or debris from the stabilizers. Use a mild soap or detergent and a soft brush to gently scrub away any grime. Once clean, thoroughly rinse the stabilizers with fresh water and allow them to dry completely before storing them. Regular cleaning and drying will prevent the buildup of dirt or salt, which can cause rust or deterioration of the stabilizers.
Checking for Wear and Tear
Regular inspections for wear and tear will help you identify any potential issues with the stabilizers before they become more serious. Check for any signs of cracks, breaks, or weak spots in the materials. Inspect the connections, hardware, and attachment points for any signs of wear, rust, or damage. If you notice any issues, address them promptly by replacing or repairing the affected parts. By promptly addressing wear and tear, you can extend the lifespan of your stabilizers and ensure their continued reliability and performance.
Replacing Parts as Needed
Over time, certain parts of the stabilizers may need to be replaced due to wear and tear or damage. It’s important to use high-quality replacement parts that are specifically designed for your stabilizers. Refer to the manufacturer’s guidelines or consult with a professional to ensure that you select the appropriate replacement parts. Regularly replace worn-out or damaged parts to maintain the integrity and effectiveness of your stabilizers.
Seeking Professional Advice if Needed
Consulting with Experienced Kayakers
If you have any doubts or questions regarding the attachment or use of kayak stabilizers, it’s always wise to seek advice from experienced kayakers. Reach out to friends or fellow kayaking enthusiasts who have experience with stabilizers and ask for their insights and recommendations. Experienced kayakers can provide valuable tips and guidance based on their own experiences, helping you make informed decisions about your stabilizers.
Getting Assistance from Kayak Experts
Another option for seeking professional advice is to consult with kayak experts. Local kayak shops or outdoor retailers often have knowledgeable staff who can offer guidance on stabilizers and their proper attachment. They can provide recommendations based on your specific kayak model and individual needs. Take advantage of their expertise and ask any questions you may have to ensure that you’re making the right choices for your kayaking adventures.
Attending Kayak Stabilizer Workshops
If you want to dive deeper into the world of kayak stabilizers, consider attending kayak stabilizer workshops. These workshops provide hands-on training and guidance from experts in the field. You’ll learn valuable tips and techniques for attaching and using stabilizers, as well as have the opportunity to practice under the guidance of professionals. Kayak stabilizer workshops can be a great way to broaden your knowledge and gain confidence in using stabilizers effectively.
By following these best practices for attaching kayak stabilizers securely, you can enhance your kayaking experience by increasing stability, maneuverability, and safety. Remember to choose the right type of stabilizers based on kayak size, weight, and your skill level. Properly prepare and install the stabilizers, ensuring secure attachments and adjustments. Test the stability in various conditions, and regularly inspect and maintain the stabilizers to prolong their lifespan. Seeking professional advice whenever needed will further enhance your understanding of kayak stabilizers and help you make informed decisions. Now, it’s time to hit the water and enjoy a stable and secure kayaking adventure!